Thursday, December 31, 2009
Arugula & Red Cabbage Salad with Balsamic Vinaigrette
I haven't always been so ZEN about holiday eating, however. Consumed by guilt and fear of weight gain, holiday gatherings were a serious emotional ordeal. I constantly worried about what I ate, how much, and the caloric ramifications of my sugar-laden actions. Each bite of double chocolate cheesecake brought about simultaneous feelings of pleasure and pain. I loved my Mom's homemade cheesecake with its creamy decadence yet with eat bite, up went the calorie tab in my head. And of course the worst part of my eating insanity was the more I stressed about my food and tried to restrict it, the more I shoved into my face. I remember inhaling cranberry pear tart at midnight because earlier in the evening I stated I was done eating tarts! The more aggressive and restrictive I got, the more my inner child rebelled. "No more desserts, you say? I'll show you!!!" And of course who ended up stuffed to the gills and anxiety ridden after such a binge...me!
This nasty cycle went on for years and didn't really clear up until I started looking at food as a way to nourish and heal myself rather than a mechanism for control. I think it's almost impossible to take the emotionality out of eating. However, when we nourish ourselves in the context of self-care, gratitude, and love, the urge to stuff our over-active neurosis with food melts away. I now take the food I need, thank my tummy for digesting all I put into it, and I'm done.
How the heck did I even get on this topic? Oh right, craving salad. So here is my way of balancing out the heaviness of holiday fare and guilt...a bright winter salad! This combo is a great mix of textures with a fantastic sweet and pungent punch. Cabbage and arugula are also helpful detox foods, making this salad perfect for cleansing the system after unaccountable cookies and too much champagne.
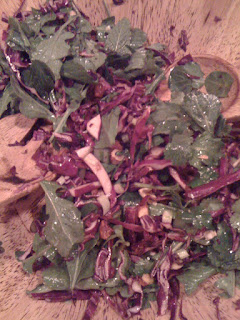
Arugula & Red Cabbage Salad with Balsamic Vinaigrette
Serves 3-4
3/4 of 1 head organic red cabbage
2 cups arugula, washed
1/4 cup cilantro, chopped
1/4 cup fresh mint, chopped
3 scallions, chopped
2-3 tablespoons unrefined and peppery olive oil (my fav is Bariani)
2 tablespoons sweet balsamic vinegar (my fav is again, Bariani)
1 teaspoon sea salt
1/4 cup dry roasted almonds, chopped
Start by shredding the cabbage. Place cabbage on it's flat end and cut in half. Cut in half again, which gives you 4 quarters. Place one quarter in the fridge for another time. Slice cabbage into thin strips, avoiding the white core. Cut the cabbage strips in half and place in a large bowl. Add in the arugula, cilantro, mint and scallions. Drizzle with olive oil, balsamic vinegar and salt and toss well. Top with almonds and serve. Enjoy!
Monday, December 21, 2009
Coriander Collard Greens with Sweet Potatoes
And so goes the American relationship with greens. They are for garnish or iguana food, certainly not for the pristine palates of humans! In fact it is rare for anything green to cross most people's plates on a weekly basis, let alone daily (and no, parsley doesn't count). In my experience those who say they don't like greens just haven't had them prepared correctly. For example, I always thought I hated asparagus because my grandmother boiled it to grey mush. Yet there is nothing more divine in late spring than asparagus on the grill with a punch of lemon and Parmesan. OMG! We must all remember it's not the green we detest, but what's been done to it.
Gray now devours any green I put in front of him and loves every bite. (Or so he tells me.) So, what's my greens secret?...I NEVER steam or boil them. Alright, let me rephrase. I never serve vegetables prepared plain without any sort of aromatic or fat. Would you just boil meat and serve it up? I hope not. Greens, like any other whole food, need a little help. Aromatics (garlic, onion, shallots) bring out the greens' innate sweetness while fat rounds out the flavor. Steamed or blanched is fine, just be sure to top the vegetables with a nice vinaigrette, pesto, or fruity olive oil.
Most of my clients, particularly women, look to salads for their vegetable intake. While salad is good, it only gets you half way there. To really get all the vitamins and minerals you need, you've got to go darker and leafier. Try branching out from spinach and romaine lettuce and pick up a gorgeous bunch of kale or collard greens. These foods are not only delicious but also loaded with fiber to help move out all that excess holiday food ;)
This is a wonderful anytime dish and would even go nicely on your holiday table. What, you weren't going to serve anything green at your holiday festivities? Well, now you are. I also like to make extra and scramble it up with eggs in the morning.
Coriander Collard Greens with Sweet Potatoes
** FYI- Collards can be a bit bitter. If you are sensitive to this flavor, try the recipe with kale instead.
1 yellow onion, diced
2-3 tablespoons olive oil or organic butter
2 cups sweet potatoes, peeled and cubed
1 teaspoon coriander powder
1/4 cup water, divided
sea salt to taste
3-4 cups collard greens, washed and finely chopped (kale or swiss chard work well too)
1/4 cup cilantro, chopped (optional)
1 teaspoon fresh lemon juice
In a large saute pan, heat the olive oil over medium heat. Add the onion and a pinch of salt and saute for 5 minutes, until onions become translucent. Toss in the cubed sweet potatoes and coriander and stir until evenly coated. Add half the water to the pan and cover, allowing the potatoes to quickly soften, 7-8 minutes. (Add more water if necessary.) While the potatoes are cooking, cut the collards. Roll the greens into long cigars and chop into thin strips from one end to the other. Cut the strips in half for even cooking.
When the potatoes have softened, remove the lid and add the collard greens and cilantro. Mix thoroughly and add another quick pinch of salt and the remaining water. Return the lid to the pan and reduce the heat to low. Let the saute cook for another 8 minutes or until the collards are dark green. Remove the lid and stir the mixture together. Season with salt to taste and drizzle with the lemon juice and a touch more olive oil. Enjoy!
Monday, December 14, 2009
Curried Sweet Potato Latkes
Picture of my lovely mother in her holiday glory...on the phone as usual!
It's completely bizarre that I associate Martha with Hanukkah, especially as her book regales the numerous ways to host an authentic Christmas gala. Whatever! Ultimately it's about being with family, smelling fried latkes and wishing for one of our party guests to bring me that Black Bottom Pie!
Though maybe not up to Martha's standards (we did use every day plates, after all) this year's Hanukkah party was certainly a hit. For many reasons in fact, but particularly due to the sweet potato latkes. I sound like a freak when it comes to my mom's food but it's just so good that I one) can't stop eating it (what happened to mindful eating?) and 2) don't want to share it. Luckily there were plenty to go around so I didn't resort to horde-mode. These sweet, spicy, and starchy little cakes are a welcome twist on the classic potato pancake. It's a latke with spunk! Be sure to make extra as they are a brilliant treat for breakfast.
Curried Sweet Potato Latkes
1 pound sweet potatoes, peeled
1 onion, peeled
1/2 cup buckwheat flour (Buckwheat is a gluten-free flour that gives the latkes a nice crispiness. Whole wheat flour will work as well)
1 teaspoon baking powder
2 teaspoons curry powder
salt to taste
2 organic eggs, beaten
3 tablespoons olive oil, coconut oil, or ghee for frying (I usually don't recommend olive oil on high heat but this once won't kill you)
Grate sweet potatoes and onion and put together in a bowl. Add in the flour, baking powder, curry power and salt and mix thoroughly. Stir the beaten eggs into the mixture.
Heat the oil in a frying pan on medium-high heat. Caution: You do not want the oil to smoke. Drop 2-3 tablespoons of the batter (depending on what size you like) into the oil and flatten. Fry over medium heat on both sides until golden. Place on a paper towel to drain excess oil. Serve with a dollop of sour cream sprinkled with scallions or apple sauce. Enjoy!
Monday, December 7, 2009
Vanilla Maple Granola
So what I've learned is if I can't go through him, I will go around him. My way of getting around the breakfast debacle was to simply give him a better yet similar option. "Have you ever tried granola?", I asked one morning. "Yeah, it's OK," he replied, not really listening to me. "What if I got you some to try instead of your regular cereal?", I queried. "Sure, I'm open." I'm open??? Sweet! Not one to look a gift horse in the mouth, I ran off to Whole Foods to get what I thought was a healthy breakfast alternative. Man, was I wrong! Most of the granola available had almost as much sugar as regular cereal complete with bizarre freeze dried strawberries and other "fruits". I was able to find one that fit my requirements but for the most part the selection left much to be desired. After a few months (yes months!) of eating barely Jamie-legal granola I said, "You know, the granola you get is kind of expensive and loaded with sugar. What if I make you some instead?", I offered. "Sure, I'm into it."
And so it was on that very day that Gray became a homemade granola man. He liked the first batch so much he's been making it himself every few weeks for the last 3 years. It's the only thing he makes, but he makes it good! I certainly feel proud of my little triumph over the sugared breakfast cereal. Now I just need to work on the copious beer consumption. Though I fear that's a lost cause!
Vanilla Maple Granola
2 cups organic whole rolled oats
1 cup sunflower seeds
1 cup raw nuts, chopped (almonds, walnuts, pecans, cashews)
1/2 teaspoon sea salt
1/4 cup shredded coconut (optional)
1/3 cup organic maple syrup (you can us a little extra if you like things particularly sweet)
1/3 cup extra virgin coconut oil or organic butter, melted
1 tablespoon real vanilla extract (no corn syrup or coloring added)
Preheat the oven to 350 degrees. Combine oats, seeds, nuts, salt and coconut in a large bowl. Whisk together the maple syrup, oil/butter, and vanilla and pour over the dry ingredients. Spread out in a large Pyrex baking dish. Make sure the granola is not piled on too high. Use two smaller Pyrex dishes if necessary.
Bake for 25-30 minutes or until golden, stirring twice during baking. Remove from the oven and let it cool. Store in a large cereal container and enjoy! This granola also make a fantastic gift.
Wednesday, December 2, 2009
Preserved Lemons
So why am I giving you a recipe for preserved lemons and not clay pot chicken with charred tomatoes? Well for one, tomatoes aren't in season (HA, gotcha!) and two, I'm totally intimidated! I know its hard to believe but I am seriously nervous to break in my new equipment. I've read Paula's book cover to cover and already know what I want to make (Bulgar and Greens with Pistachios and Yogurt) but I just can't get myself to do it. YET. That being said, now I've put it out there so I have to do it. Alright, I will. Go Jamie go!
In the meantime, try these super easy preserved lemons. It's a great way to keep lemons you don't have time to use while fresh. They also make a fantastic gift. As for uses, chop them up and put in your eggs, salad, lentils, greens, and grain dishes. Enjoy!
Preserved Lemons
Adapted from Paula Wolfert's Mediterranean Clay Pot Cooking
3 medium sized organic lemons
1/3 cup coarse salt
1/2 cup fresh lemon juice (from your other organic lemons)
extra virgin olive oil
Scrub the lemons and dry well. Cut each into 8 wedges. Mix them with salt and place in a 1 cup capacity glass jar. (I used a 1 1/2 cup capacity jar and it was fine.) Pour in the lemon juice. Close the jar tightly, give it a good shake, and let the lemons ripen at room temperature for 7 days. Be sure to shake the jar every day to distribute the salt and juice. To store, add olive oil to cover and place the jar in a cool cupboard or the refrigerator. They will last for up to a year. Be sure to rinse lemons before use.
**According to Paula, a white lacy growth MAY appear in your preserving jar as the lemons mature on the shelf. Don't worry about it. Simply discard it when you open the jar and rinse the lemons before use.
Sunday, November 29, 2009
Maple & Spice Glazed Nuts
Walnuts and pecans cooked down with tons of sugar and spice to make an awesome holiday munchy...how could I resist? She'd spread them all over the house so no matter what room I entered, there they were starring at me, willing me to eat just one more. Of course, one more turned into another handful which turned into me nonchalantly grazing in every room so that our guests wouldn't catch on to my sugared nut frenzy!
Thankfully this all stopped when I cut white sugar out of my diet. It still amazes me how much less stress I experience by not freaking out over calories and fat during in the holidays (family freak outs are another issue, however). Instead, I look at how the food reacts in my body and I know white sugar is a definite no no. My compulsion around the nuts was not only about my fear of fat but also the biological reaction that when I eat sugar I NEEDED more of it. And yet, over the years I've realized you cannot be all or nothing about food, or life in general. Rigidity leads to compulsion which inevitably makes way for anxiety and self-criticism.
So what can we do about the holiday foods that do us in every year? Why make a Jamie|Living version, of course! Here is a delicious rendition of my mom's holiday nuts without the white sugar. And where did I get the recipe? From my mom! Over the last few years she too has jumped onto the no white sugar bandwagon and has altered a number of her recipes to make them a bit more healthy and just as divine. Now be careful, even without the white stuff it's hard to just have a few ;) Enjoy!
Maple & Spice Glazed Nuts
3 tablespoons real organic maple syrup
1/4 teaspoon cayenne pepper (add a bit more if you like things spicy!)
1 teaspoon lemon zest (optional)
2 cups nuts (pecans, walnuts and cashews work best)
1 pinch of salt
Toss all ingredients together and place on a baking sheet. Bake at 300 degrees for 15 minutes. Allow to cool fully for the syrup to harden. Spread around the house so you are always within arms reach of this scrumptious treat :)
Monday, November 23, 2009
Black Bean Pilaf with Cilantro Lime Dressing
Wednesday, November 18, 2009
Seaweed Soup with New Friends
Tuesday, November 10, 2009
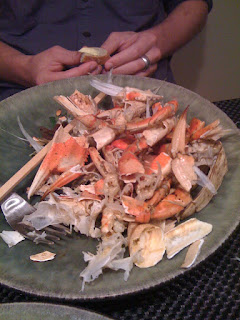
When Crabs Cry
Thursday, October 29, 2009
Gluten Free Chocolate Brown Rice Crispy Treats
Monday, October 26, 2009
7 Delicious Uses for Avocados
Tuesday, October 13, 2009
Rainy Day French Lentil Lunch
Monday, October 12, 2009
Lamb and Kabocha Squash Mole
Thursday, October 1, 2009
Coconut Sweet Potato and Kale Stew
Tuesday, September 29, 2009
Sauteed Purslane and Tomatoes
Tuesday, September 22, 2009
Herb Roasted Chicken
When I gave up chicken 7 years ago I was sure I'd never go back. Meat isn't good for me anyway, I reasoned. But to tell the truth, I was simply chickened out. At the time, chicken was the only animal protein I ate (having decided years earlier beef was a death sentence.) Being a weight obsessed collegiate, I also dabbled in the "Atkins thing", which meant eating protein, aka CHICKEN, everyday. Each week I bought a bag of frozen Tyson's chicken breasts to pick at over the next 7 days. No wonder I was insane. You can only eat chicken stir-fry so many times before you lose it. And I know you are going to think this is totally "woo woo" but I started acting like a crazy chicken too! I was irritable, easily flustered, and ran around campus frazzled like, you guessed it, a chicken with my head cut off.
It felt really good giving up animal flesh. I felt light and energized in my body and got to tell people, "oh no, I don't eat THAT." It was self-righteous and I liked it! Yet once I started eating meat again I still couldn't stomach chicken. I ate beef, lamb, even goat but there was no way I was headed down the chicken path...until I went to Zuni Cafe. I was having a lovely lunch of local anchovies and salad with Jacqueline (crispy chicken skin girl) when the next table's waiter delivered their order of roasted chicken with Tuscan-style bread salad. I almost blurted out, "Excuse me, that order was actually for me," but instead I bit my tongue and shot our neighbors nasty glances as they inhaled that sumptuous chicken. That was it for me! I was ready for a little chick chick. Of course, it took 6 months and 1 meat book later to actually make chicken but hey, it was worth the wait.